The file 'dlx_dev.tar.Z' is a compressed tar file of the VHDL description for
a pipelined implementation of the DLX microprocessor. The uncompressed tar file
will create a directory structure which is to be used with the Mentor QHDL
simulation environment. You can unpack it by doing:
	%uncompress dlx_dev.tar.z
	%tar -xvf dlx_dev.tar
After uncompression, you will get a directory tree which looks like:
dlx_dev/
      doc/		   documents, block diagrams, tutorials etc.

      bin/		   dlxsim, dlx2obj (for converting source file to object file)

      obj/                 object code compiled for Mentor QHDL Simulator

      src/                 all VHDL source files, each directory under this directory
                           represents a VHDL 'library' (except for Makefiles directory)

          utils/           various utility packages
          dlx/             behavioral models for DLX blocks
          dlxgate/         gate level synthesized implementations (msu_scmos) of DLX blocks
          msu_scmos/       behavioral models of msu_scmos standard cells
          msu_timing/      timing packages used by msu_scmos models
          Makefiles/       Makefiles for compiling each library

      *.s                  DLX assembly source test cases
      *.obj                'object' files of source test cases, produced by executing
                             'dlx2obj file.s'  ->  creates 'file.obj'.
      synopsys/            directory for doing synopsys synthesis to msu_scmos gate level
        syn_msu_scmos/
           *_opt.script    sample 'dc_shell' scripts for synthesizing a behavioral block to
                           a gate-level implementation in the msu_scmos library
To run a VHDL simulation of the DLX processor, you must first create a DLX assembly source file, 'file.s'. You should simulate this via 'dlxsim' to verify what the correct memory and register contents should be after simulation. Note that dlxsim has been modified at MSU to make it compatible with the MSU version of shift encoding implementation for the DLX microprocessor.
Next, convert the source file to an 'object' code format which the DLX memory models can
understand by running the script:
dlx2obj file.s
This will create a file called 'file.obj' which will be used by the DLX memory models. You must ensure that the entry point in your source file, 'file.s' must be named '_main' in order for the 'dlx2obj' to work correctly. Also note that 'dlxsim' and 'dlx2obj' must be kept in the same directory.
The DLX VHDL configuration 'dlx_dev/src/dlx/cfg_acid_test.vhd' must be edited and the appropriate GENERICS modified to reflect the name of this object file. The 'file.obj' file must be in the 'src/' directory, above the individual package directories. The 'dlx2obj' script has a built-in limit of 2048 instruction words; this should be plenty for any DLX verifications we will run.
You need to have the environment setup for the Mentor 'Quick HDL' simulator. You can contact
your system administrator to set this up for you. To run the simulation, from the 'dlx_dev/src'
directory you can do either:
qhsim -lib ../obj/qhdl/dlx cfg_acid_testOR
qhsim -lib ../obj/qhdl/dlxgate cfg_acid_test
The difference between the two is that the 'dlx' library (under dlx_dev/src/dlx) contains behavioral models while the 'dlxgate' library (under dlx_dev/src/dlxgate) contains some gate level models which have been synthesized to the 'msu_scmos' library.
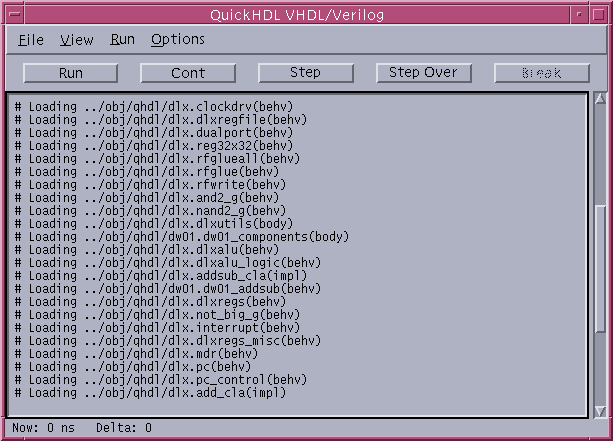
After invoking 'qhsim', you will see the main simulation window for QuickHDL.
It is labeled QuickHDL
VHDL/VERILOG and should look as follows:
You should see a bunch of 'loading' messages as VHDL object code modules are loaded. From within this window, type:
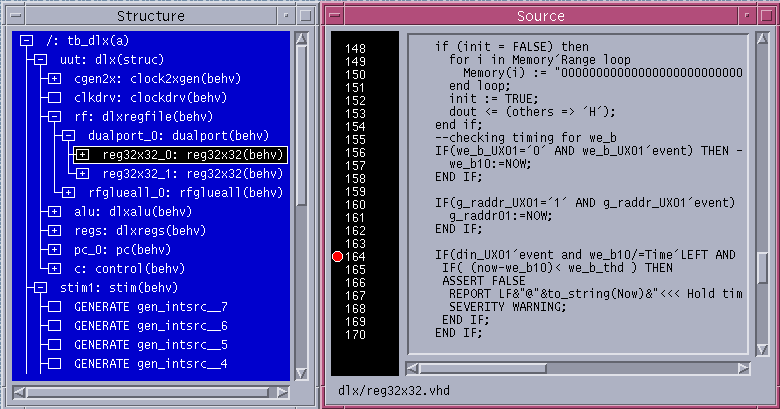
view *This will cause MANY windows to pop up; do not be intimidated by the number of windows. The windows and their functions are as follows:
There is a command file called 'wave.do' which will display all of the signals between the top level blocks of the DLX model; you can execute this via the 'File->Execute Command File' menu choice from the main simulation window or just by typing 'do wave.do'. The stimulus module (dlx/stim.vhd) for the dlx_dev/src/dlx/cfg_acid_test.vhd is set up for a 200 ns clock; to run the simulation for one clock cycle, you need to type 'run 200 ns' in the simulation window. For multiple clock cycles, you need to run it for the equivalent amount of time.
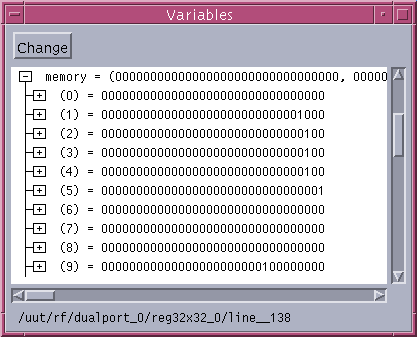
If you want to monitor the register file contents as they are modified, from the structure window you can click on the 'reg32x32(behv)' block under the 'dualport(behv)' block which in turn is under the 'rf:dlxregfile(behv)' block; this will cause the VHDL source of this block to be displayed in the source window. Clicking on a source line in this window will set a breakpoint; set a breakpoint in the process block of the source and run the simulation for some more time so that the breakpoint is hit. Once the breakpoint has been hit, the 'variables' window will show the values of the variables in the 'rf:dlxregfile' process. Clicking on the 'memory' variable in this window will show you the contents of the 32 registers. To remove the breakpoint, just click on the source line again. You can view data memory contents by setting a breaking point in the 'md: memoryd(behv)' process in a similar fashion.
The number of signals displayed in the 'wave' window can cause a considerable amount of confusion.
By far, the most important traces are the following:
 /uut/c/decodestate_int
 /uut/c/executestate_int
 /uut/c/memstate_int
 /uut/c/writestate_int
These traces are the current 'state' of the finite state machines for the decode, execute,
memory, and writeback pipeline stages (the fetch stage has only a two state FSM). These values
are displayed in decimal; the file 'dlx_dev/src/dlx/define.vhd' lists the states of each of these FSMs.
By watching these traces, you can follow the progress of an instruction as it makes it way through
the pipeline stages. Occasionally you will see a value of '0' appear in these FSMs, this is
the 'stall state' and is used for memory and branch stalls. Other important traces:
 /iaddrbuss_int    - the address of the current instruction being read from instruction memory
 /daddrbus_int     - the address of the current data being read/written
 /destbus_int      - the output of the ALU stage for the instruction currently in
                         the execute stage
If you have changed any code in the 'dlx' or 'dlxgate' directories, then it will need to be recompiled. Execute one of the following commands from the 'dlx_dev/src' directory:
 gmake -f Makefiles/Makefile.dlx  TOOLSET=qhdl
 gmake -f Makefiles/Makefile.dlxgate  TOOLSET=qhdl
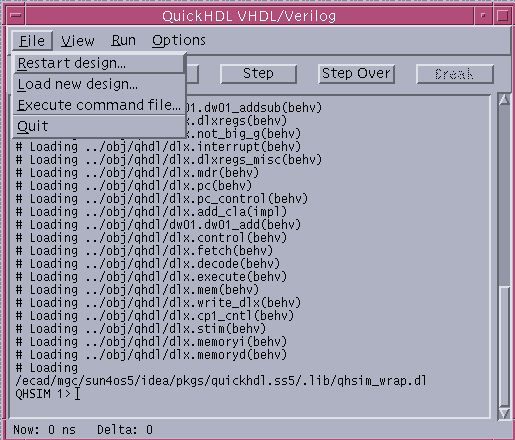
to recompile any changed code in the 'dlx' or 'dlxgate' directories, respectively. If 'qhsim' is active, the menu command 'File->Load new design' can be used to load the new object code. The menu command 'File->Restart design' is used for restarting the simulation at time 0.
;; simple example for DLX simulation

  .align 4

data1:
        .word 0x00000000

_main:
        add r9,r0,(data1)   ; get address of data in r9
                            ; we know address of data is only 16 bits
        add r1, r0, #8
        add r2, r0, #4
        sub r3,r1,r2
        sw  0(r9),r3        ; store out to memory
        lw  r4, 0(r9)       ; get it back, no load delay slot here,
                            ; pipeline stalls

        seq r5, r4,r3       ; check if they are equal!
        bnez r5, data_ok
        nop                 ; branch delay slot
error:
        j   error           ; loop endlessly here if we get an error
        nop                 ; branch delay slot
data_ok:
        trap #0             ; jump back to location 0 and repeat
        nop                 ; branch delay slot
You first need to run dlx2obj on test.s and edit the 'dlx_dev/src/dlx/cfg_acid_test.vhd' file to
include 'test.obj' for the object file. After the simulation, lets look at some of the traces:

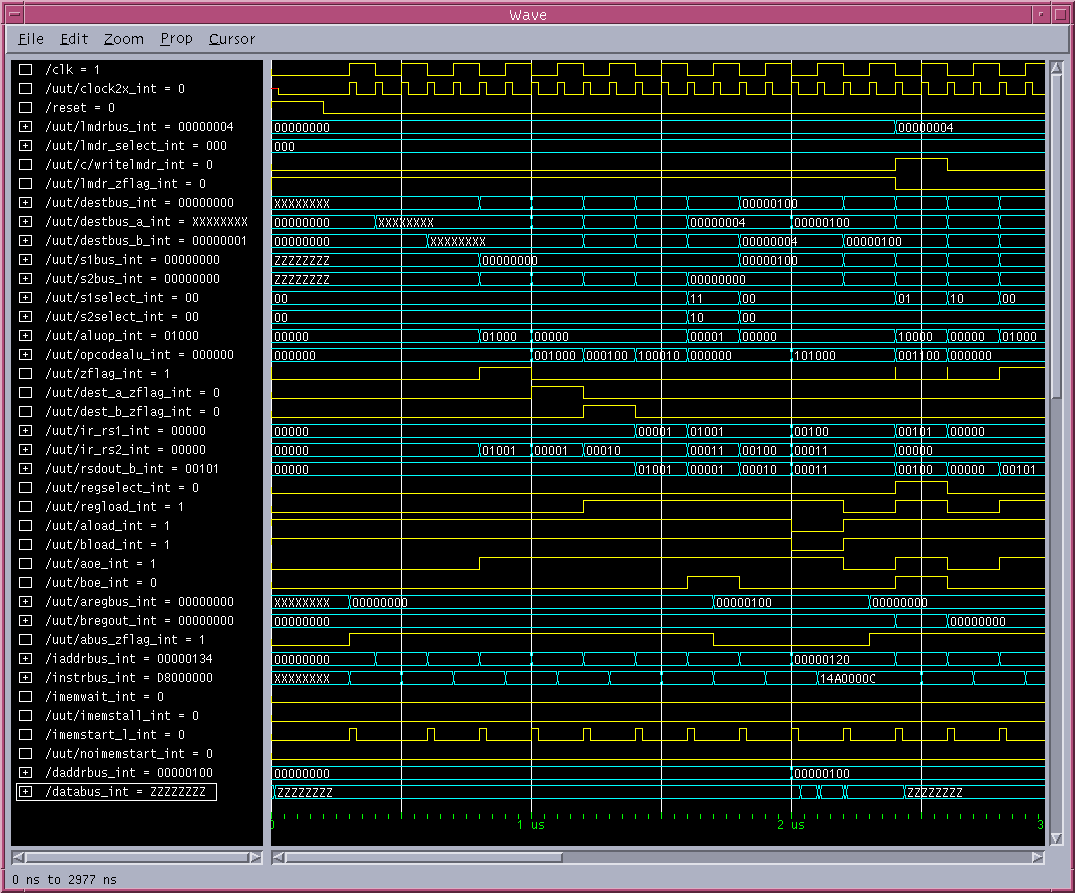
Note that `iaddrbus' (instrucation memory address bus) starts out at '00000000' (PC=0x0). The label '_main' has an address of '0x00000104' and this is where the next instruction should be fetched from. The first instruction that is fetched ('0x08000100') is actually a jump to _main instruction and when this jump is taken, the PC has the value '0x00000104'. Otherwise the PC is just incremented by 4.
As is obvious, if the code works fine the execution keeps repeating because of the 'trap #0' instruction. That is precisely what we observe. Looking at the 'instrbus' and 'iaddrbus' traces, we can deduce that after around every 3 micro seconds, the execution is repeated.

As load instruction is followed immediately after a store instruction, we have a load stall because in the case of a pipelined machine this leads to a hazard.

The progress of the instruction as it makes its way through the pipeline stages can be known from
the current states of the FSMs for these stages:

You can look at 'dlx_dev/src/dlx/define.vhd' to know what these states stand for. For example, in execute FSM -- 27 stands for ADDI_STATE, 5 for SUB_STATE, 42 for SW_STATE, 37 for LW_STATE etc.
Your simulation results for some of the traces should look like this.
The final register contents are in agreement with our expectations, i.e., r1 has 8, r2 has 4, r3
has 4, r4 has 4 and r5 has 1. r9 has the address of the data.
The 'dlx_dev/synopsys/syn_msu_scmos' directory was created to support synthesis of behavioral blocks which are mapped to the 'msu_scmos' library. All the gate level models which have been synthesized are put in 'dlxgate' library (under dlx_dev/src/dlxgate).
If for any reason you need to synthesize the blocks, then copy
the file 'dlx_dev/src/dlx/file.vhd' to the 'dlx_dev/synopsys/syn_msu_scmos/rtl' directory.
From within the 'dlx_dev/synopsys/syn_msus_scmos' directory, execute:
dc_shell -f file_opt.scriptThe synthesis result is written as a VHDL file to the 'dlx_dev/synopsys/syn_msu_scmos/gate' directory. The 'file.vhd' file in this directory is actually a gate level implementation using the 'msu_scmos' library (note that 'file' is being used as a generic name). To incorporate this file back into the DLX simulation, first remove the equivalent symbolic link in the 'dlx_dev/src/dlxgate' directory, then copy the new gate level VHDL file to the 'dlx_dev/src/dlxgate' directory. Before this will compile under QuickHDL, you must comment out the lines which refer to the 'CONV_PACK_execute package' and add the following lines:
library msu_scmos;
use msu_scmos.msu_scmos_components.all;
You should also note that the architecture for these synthesized models is now called 'SYN_behv', you will need to edit the 'dlxgate/cfg_acid_test.vhd' file to ensure that the associated component in the configuration is now using the correct architecture.